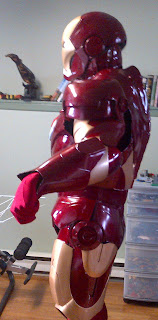
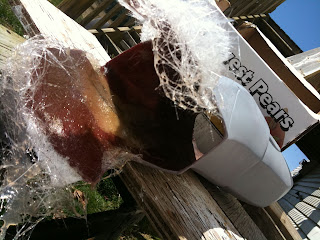
A few final tweaks done to various ride heights. By jove, I think I've got it!
PS: Please excuse the mess :-S

Saturday 24 November 2012
Wednesday 7 November 2012
Test fit
A little fun with the test fits...
- the ARC reactor was just tossed in there as a placeholder as I couldn't find the new UniBeam at the time...
- All gold pieces have been carefully brushed to closely imitate the metal grain of the screen-used suit
- Still need to raise the shoulder bells up an inch or so
- Need to fabricate the collar struts in aluminium
A few more pictorial Range of Movement studies to follow this weekend...
Tuesday 25 September 2012
Friday 7 September 2012
Fitting the plates
Starting the test fit process...
The scale and symmetry are pretty much bang on so far.
That is one of the biggest nard-kicks about armour fabrication... you can have absolutely gorgeous individual pieces; but they can still look like pure unadulterated crap when put together as a unit!
This is an absolutely mandatory step prior to even considering laying the colours!
Also found that I can suit up to at least this stage without assistance :-)
Monday 16 July 2012
Time to start tailoring it to yours truely
OK... the shells are about as finished as they are getting.
Need to start linking it all together now.
First order of business is to Duct tape the legs together to do a bit of tailoring for length at the ankles
After that comes the Integration of the new knee joints... all that sort of stuff :-D
Need to start linking it all together now.
First order of business is to Duct tape the legs together to do a bit of tailoring for length at the ankles
After that comes the Integration of the new knee joints... all that sort of stuff :-D
One caveat I ran into is that Duct Tape is so strong that it actually tore up sections of the Bondo as I removed the tape! Don't be dopey like me, get a partner to hold the legs while you mark them :-p
Friday 20 April 2012
Final BodyWork Phases
Well... getting allot closer to the point where I can start to articulate this beasty to my personal kinematics. Once this final prep work is done I will begin with integrating the mounting platforms for the soon-to-be integrated tech.
After that comes the installation and fine tuning of all joints as well as all other distal-trunk interconnects to allow this suit to work as a proper unit.
And let us not forget the PAN (Personal Area Network) that has to be installed to allow for the controllers to do their thing.
+++++++++++++++++++++++++++++++++++++++++++++++++++++++++++
After that comes the installation and fine tuning of all joints as well as all other distal-trunk interconnects to allow this suit to work as a proper unit.
And let us not forget the PAN (Personal Area Network) that has to be installed to allow for the controllers to do their thing.
Heel plates all blended in...
Rocket Bay compartment all fabricated and integrated...
+++++++++++++++++++++++++++++++++++++++++++++++++++++++++++
Forearms and shins have been treated to a dual coloured primer sand test to reveal peaks and valleys not easily discernable to the naked eye.
Decided to reinforce the ankle sections with fiberglass as the Bondo'd seam transitions kept cracking from the flexion on that area.
The back is all ready to go now! I will later seperate the lower flaps away from the structure so I can articulate/actuate them
Helmet is damned near ready to install the control systems for servos, lights and voice modulation!
Next Year:
Already in R&D:
- Voice control command system for hardware
- Wireless PAN to replace most of the internal wiring harness
- Custom built knee joints and locking systems to replace any velcro etc
Friday 16 March 2012
Sensible Shoes...
Just got my Calden K881805 lift boots to form the core/base of the Iron Man armour.
They "lift" me to about 191 cm, which will place me at about 195 cm in full regalia. So that should be imposing enough I think :-P
As you can see, they hide up perfectly1
They "lift" me to about 191 cm, which will place me at about 195 cm in full regalia. So that should be imposing enough I think :-P
As you can see, they hide up perfectly1
About to fit/articulate in the upper boot plates...
Monday 12 March 2012
Fiberglass / Resin Hell
Well I have spent the last couple of weekends reinforcing the flimsy vacu-formed ABS parts so they might actually stand up to their intended roles.
Weekend 1 went well and very minor fumes... nothing that my push fan and exhaust fan couldn't handle. However, this past weekend was quite another matter. The winds were quite high, and I believe that the wind pushing in the window was of a higher force than my extraction fan was able to deal with, so the fumes got pushed not only back into my shop, but throughout my house :-(
In the end, I had to hermetically seal my workshop and leave the extraction system running for a few days to clear it, whilst opening windows around the house to air out the initial escaped fumes from the living areas. This was less than ideal as it was fairly cold out.
Anyway lesson-learned. Do not do this when the winds are up, and try to time it for when the wife and kids are away for the weekend just for safe measure :-p
FYI: The fiberglassing was fine for the ABS, and caused no damage or warpage. Furthermore it increased the surface rigidity by a factor of at least 2 with only one layer. This is good enough for some areas, but others will require a second cross-hatched layer, such as the greaves(shins) and the forearm rocket bay.
________________________________________________________________________
Well, as of today, all fiberglassing is done and all Bondo'ing of seams has been laid.
Started sanding and feathering all Bondo'd seams (Yay)
One last sanding before I lay a dark layer and another lighter layer of primer to detect hills and valleys
Thursday 1 March 2012
My new gloves!!
Can't say enough good about these Masked Rider gloves... I have some work to do to them yet, but they are going to be amazing!
Wiring is completed...
Starting the endo-wiring to maintain alignments
Tuesday 14 February 2012
Ver 3.3 - Visor Electronics
Ok, a couple of changes!
After installing the orbital hinges, I have decided to go with my original 3-bar system for ease of installation and stability. One of the things I borrowed from the orbital designs is the use of Chicago screws which increase the ease of installation and maintenance. Another thing added is the use of Lock-Tite to keep the posts from backing off inadvertantly.
Note, this is the beater helmet and I didn't take the time to install the eye LED arrays as they are not intended for this brain bucket.
The Firgelli linear actuators are designed for precision and longevity, not so much for blinding speed. So while the movie visor speed is not matched, the safety to the user and peace of mind requirements are more than met.
Firgelli / Hyperdyne system in action:
Visor ride height at top of open position:
Monday 23 January 2012
ARC Reactor final
Well this is it finally!
A nice lucite ring (Thank you Zabana!) with 10 sets of copper core windings soldered at the top terminals.
The LED array below is not too overstated, yet significantly bright I think...
A nice mixture of steel, Aircraft aluminum and copper... I am pretty happy with it
A nice lucite ring (Thank you Zabana!) with 10 sets of copper core windings soldered at the top terminals.
The LED array below is not too overstated, yet significantly bright I think...
A nice mixture of steel, Aircraft aluminum and copper... I am pretty happy with it
Saturday 21 January 2012
Working with the Colours
Starting paint tests under the following conditions:
Hot Chilli Red / Dark Toreador
- Natural light
- Flourescent Light
- Flash
- Mixes of the above
Hot Chilli Red / Dark Toreador
Dark Toreador | Merlot Red
Friday 20 January 2012
The Armour!!
The targetted armour shells are now fibreglass hardened and are being cleaned up from the resultant globule residue.
Note: The grey sections are the main high-stress areas that were fiberglassed; the clear sections are Vacu-Formed ABS primarily used to reduce weight at the most-distal points to the trunk... the exception being the abdomen itself which was an overall weight reduction choice.
Without tech installed, the suit comes in at about 35lbs. I estimate the final weight to be approximately 40lbs +/- 3lbs.
Subscribe to:
Posts (Atom)


